blog


May 30, 2018
Thomas Leigh Universe: most appealing ideas.
This may come in handy:


The very first version of My homepage I published on May 17, 2001. Since then I have designed a lot of new versions: from static-HTML-based, through powered by TextPattern (yet another CMS), to current implementation based on Blogger. I named it "Thomas Leigh Universe" (regarding that it covers a set of various subjects I'm engaging into).
As often, this newest version brings a bunch of ideas which I find exciting - created with the help of Blogger, jQuery and "a pinch of CSS" :) . The ones especially worth attention I'll describe below.
Time-dependent posts' headers.
Years ago I was fortunate to cooperate in developing an unique text-editor for Windows, called "Notatniczka" (in English the name would be like a feminine version of "a notepad" noun). It had plenty of original features. As a one example: You could insert customized headers - something like:
"I'm writing it on a beautiful morning at 6:04 am, on Tuesday".
To some degree those headers were responsive to particular time of the day when You were writing - it was nice, a little geeky gadget I liked from the very first time I've met - and I enjoy this idea to this day (similar thing You can use in The Bat! e-mail client for Windows, using its own syntax based on regular expressions).
Therefore, while developing My skills as a Blogger templates designer - I've become curious would it be possible to introduce similar headers here? I suppose it would, but I wasn't sure.
First I took a closer look on how exactly Blogger renders date and time stamps within each post. Then I started to (gently ;) ) introduce some jQuery lines to interact with those stamps' content. I'd like to turn ordinary labels into something more human, more personal, like - for example -
"I've published it one beautiful day of June, on the nice morning".
It was pretty challenging, especially given My native language's grammar (I needed to obey things like nouns' declination and their (masculine or feminine) kind - all those nuances influenced the code I was creating).
Finally I came with a working solution, which in fact turned standard date&time labels into a definitely more human form, nicely resembling old-fashioned letters written on paper (remember those days? I was pretty fortunate to write and receive a whole lot of them :) - btw, I encourage You to read this interesting article on the matter).

The thing I especially like in this kind of invention is that I don't need to write those "personal headers" every time - in fact I don't need to write them at all, because they are generated in a totally automated way (thanks to jQuery). I'm amazed what power this technology gives You - especially given creative thinking.
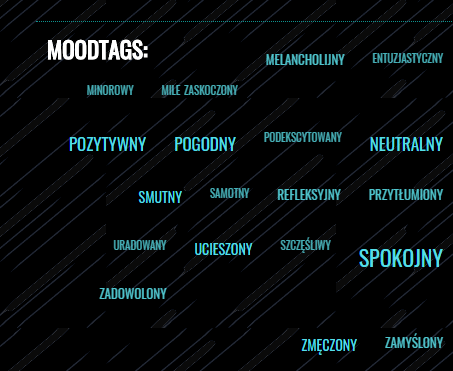
"The Mood Tags".
Another idea which crossed My mind at some point of conceptual thinking on a new version of My homepage - and excited Me much - were "the Mood Tags". Inspired by ordinary labels describing posts' subject - Mood Tags could point the moods I was in while writing various articles. This way each article could be described not only by ordinary labels, but also by Mood Tags which - again - could make browsing the website more human.
They could be placed near to subject-related labels, but naturally separated (given their different purpose). Here some challenge arises because Blogger handles only one kind of labels. Fortunately separating two kind of labels from each other wasn't a new challenge - because I've accomplished it before (I mean My design portfolio in case of which I needed to distinguish labels related to various kinds of projects - from labels describing their genre).
(click pictures to enlarge)


What could be especially exciting was that over the time I could create "the Mood Cloud", covering all articles gathered through years and showing at first glance which moods dominates (!). This way I could create a kind of "sensual map" allowing Me - in a way - to better know Myself. Besides I could be able to filter articles... based on particular moods I experienced while writing at the time. So I thought it would be nice thing to have that kind of idea implemented on My homepage :) .
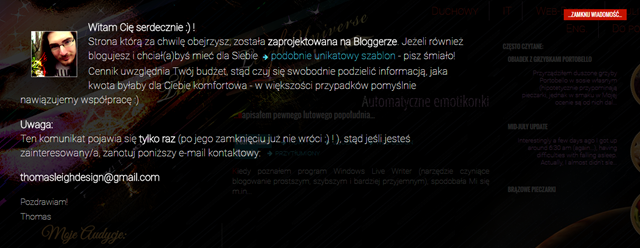
A pull-out footer.
Taking My first steps in jQuery I had the feeling that I could turn websites I design into something more of a presentation nature (like those made in PowerPoint). As a result I would create user interfaces which could be considerably more interesting, allowing Guests to interact with the site in a more "alive" and engaging way. It could be done mostly through incorporating animations and - on the other side - splitting content of the site into couple "separate layers", each of them visible on demand (and without a need of loading another and another pages - just click and see! :) ).
So far I've designed several websites with this particular approach to the UX. The one with which I am especially glad is My portfolio which resembles more an interactive app than a classic website (besides I've applied - one of My favorite - smoky glass effect *.*).

In case of the Universe project I've animated the whole footer section - beautiful, partially transparent, raspberry-pink colored (the divine CSS :) ). Btw, I am often amazed how many things today You can accomplish without the need of using Photoshop or Flash *.* (remember the time when - for example - it was necessary to prepare .gif/.png files for gradient backgrounds?).
Back to the animated footer - I've decided to make it usually hidden, leaving visible just the top part of it. You can pull the footer out whenever You want - simply by hovering the cursor over it. While it shows itself in full grace ;) - You see a contact form and random quotes.

During designing I was tempted by the idea of a contact form looking like a postcard - therefore I've made it so and now imho it looks quite friendly :) . Just next to it there is a random quotes section ("golden thoughts") with My favorite set of various "pieces of wisdom".
Pictures' captions.
This one was one of the most exciting ideas - technically-wise. It began with My appreciation of customized pictures' captions. I especially liked the idea of placing them on top of the actual pictures they referred to. But if You'd like to use those captions - You need to dedicate some "extra code" every time You insert a picture into Your post.
It seems much hassle, let alone if You care about SEO and use alt and title HTML attributes - now You have even more work to do. Since I know jQuery well enough I rather prefer to organize as many things as possible to work by themselves, without the need of putting any extra code into posts' content.
Keeping all of this in mind a surprising idea struck Me: what if I would use already existing HTML title attributes as the source of automatically generated captions? It would be pretty comfortable since Open Live Writer (the text editor I use to compose and publish articles) allows to incorporate title attribute without writing any code.

Soon later I've discovered that in fact HTML attributes can be utilized as data source for jQuery. With this knowledge I designed a mechanism which puts the content of the title attribute as a picture's caption. This way I've managed both SEO and UX usability in the same time :) .
In addition I don't need to double pictures' descriptions and - on the other hand - I'm sure that they are placed in the most appropriate place (code/SEO-wise).
It's amazing that with jQuery You can use HTML attributes which are usually not visible for the Reader (it's like moving them from the spirit dimension to the so-called "reality" ;) ).

The Photo-Exposition Mode.
In this case what inspired Me was probably the invention I've created working on another project: a mechanism (written completely from scratch) which displayed YouTube videos on a nicely looking smoky-glass layer, darkening the whole site while playing.
In the Universe context I was thinking about yet another inspiring concept: CSS filters - which I could mix with a similar smoky-glass layer and use to play with pictures. I wanted to give My Guests and Myself some fun - regarding pictures published under particular label ("photography"). If this condition is met - jQuery will allow You to open a picture on the independent layer and apply several different visual effects - simply by hovering a cursor over their names (the effects could be sepia, retro-style, abstract colors, and the like). It was fun and added some live to the project :) .

Admin icons on demand.
This deserves a dedicated article to describe the matter more in-depth - now I'd like to point out that I used this concept first time in this particular project. It allowed Me to comfortably view the website while designing it - without disturbing admin/gadget editing icons (they are still at hand - but are visible only by hovering the cursor over particular elements). In theory it is a small innovation but in a way it's a game-changer (never more using the incognito mode to be able to view the site without editing icons).
(One-time) Welcome Message.
I love creative ideas, especially unpredictable ones. One example is the Welcome Message concept which I built based on... the cookies plugin. There are plenty mechanisms to display a message about cookies policy out there. Usually they all have something in common: they are visible till You close them - after that they won't show again. It inspired Me to look at it as a great way to welcome Guests of My website, especially the First-Timers. This way it could be great opportunity not only to welcome Your Visitors - but also to give Them a quick introduction on "what is all about". So far I've implemented this concept in a variety of ways - in case of the Universe project I decided to display one-time welcoming message on a full-screen smoky-glass background.
Other ideas.
Since I've made the main menu of the site well-visible - I also wanted it to clearly indicate under which section(s) the currently displayed article is placed. Since Blogger could manage it in a quite limited way - it required some additional lines of (jQuery) code to make it work well. You can find out more about this solution here.
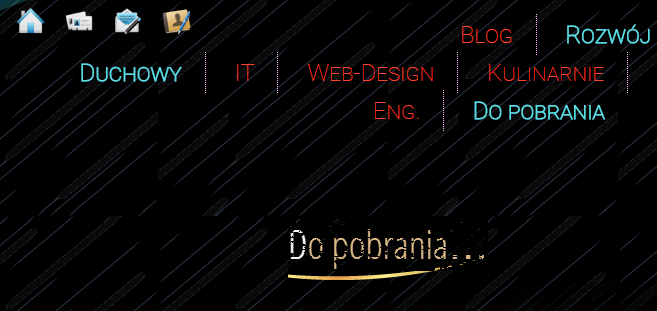
Speaking of the main menu, another curiosity is that I turned part of its items... into icons - to distinguish a few particular items from the rest. This way I also gained more space :) - and the menu itself became more clear.
Turning the menu into icons inspired Me probably from the time I saw it at Karen Valentine's portfolio (Karen often made the menu that way).
So far I happened to use this concept in a variety of ways , sometimes I only add icons to menu items to make them more interestingly looking, especially in connection with CSS filters modifying icons' colors on hover state.
One more curiosity is that one particular menu item ("contact") pulls the footer out (as You may remember, I put the contact form there). It is another thing I especially like: that You can turn selected words or phrases into interactive references (exactly like hyperlinks), which - if clicked - could trigger some actions (e.g. displaying associated sections). And - what is especially great - You don't have to handle each and every word or sentence one by one - because jQuery itself may turn every instance of a particular word or phrase interactive :) .
Font effects.
Some time ago I discovered font effects provided by Google. An interesting concept with the help of which You can make text on Your website more interestingly/artistically looking. There are several effects which You can not only use but also combine with each other :) .
Curiously You can apply those effects to other elements as well - for example You may create a whole set of original, automatically generated backgrounds.

A nice trick to engage Readers.
As You know, comments are usually placed at the very end of an article. But during the designing various surprises may pop up - working on the Universe one of those unexpected effects was a comment form placed not on the bottom - but on the side of the article. I think that this unusual placement could play a role in encouraging Readers to comment or participate in discussion.
On top of it there are customized comment headers. You are probably pretty accustomed to ordinary ones, like "No comments", or "XX comments". But what if I change them into - say - "What do You think about it?" (the subject of the article) or "So far there aren't any thoughts on it", etc.? For Me it sounds definitely more human and friendly - if I'd imagine Myself approaching that kind of headers I would feel much more eager "to drop a line" :) .

Emoticons.
Open Live Writer I've mentioned before has a nice feature of automatically turning text smileys into emoticons. Since I like the idea I thought it should be easy to design My Own version of it - for My website's purpose. Moreover, technically-wise it would work in a more elegant way because there wouldn't be more than a few graphic files involved (in comparison, OLW would upload new icons each time I publish another article). Nice thing here is that - again - You don't need to insert graphic emoticons manually at all, You just need to use simple text version of it - and jQuery will do the rest :) .
No comments:
Post a Comment